

If you have been creating and deploying Agents on Databricks, then perhaps you are already aware of the existence of MLflow Review Apps. For those who have not used them before, MLflow Review Apps are an easy way to collect feedback from your Subject Matter Experts on your agent. Databricks provides support for using review apps through the built-in interface or, if you need more customization, through a custom review app hosted on Databricks Apps.
But what if we could just bring this process directly to Slack? This blog post will walk you through building a Slackbot that enables real-time agent interaction and feedback collection.
How does tracing and feedback work in MLflow?
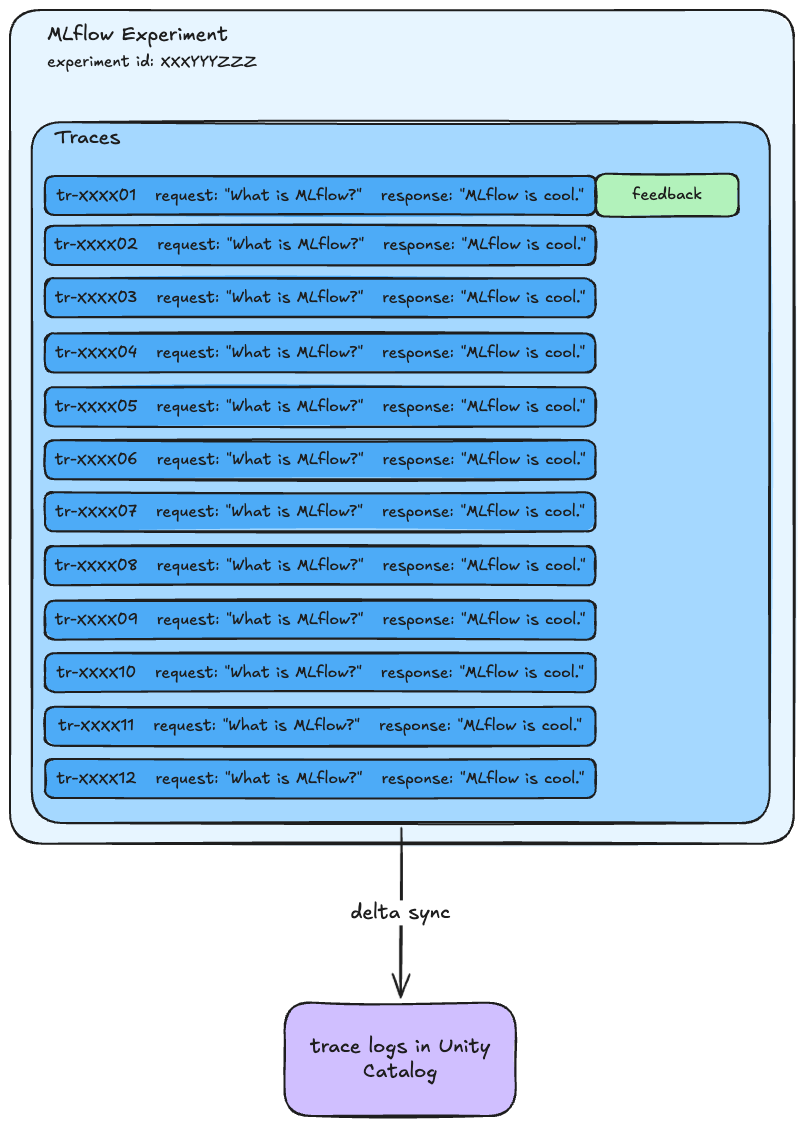
With MLflow Production Monitoring, you can see traces arrive directly in an MLflow experiment. These traces can be synced to a table in Unity Catalog.
Each trace has a unique ID automatically generated by MLflow. This ID can be used to add feedback (source: Databricks documentation) via the MLflow log_feedback function. This can be an LLM judge or human feedback. Feedback is also stored as an assessment linked to the specific trace, making it queryable through MLflow.
A labeling session (source: Databricks documentation) is a special type of run within MLflow. Databricks recommends adding specific traces to a labelling session beforehand-- the custom or built-in review app then connects to that labeling session and exposes the traces to SMEs. The app allows us to just interact with the MLflow client in a specific way. This requires us to pre-select traces.
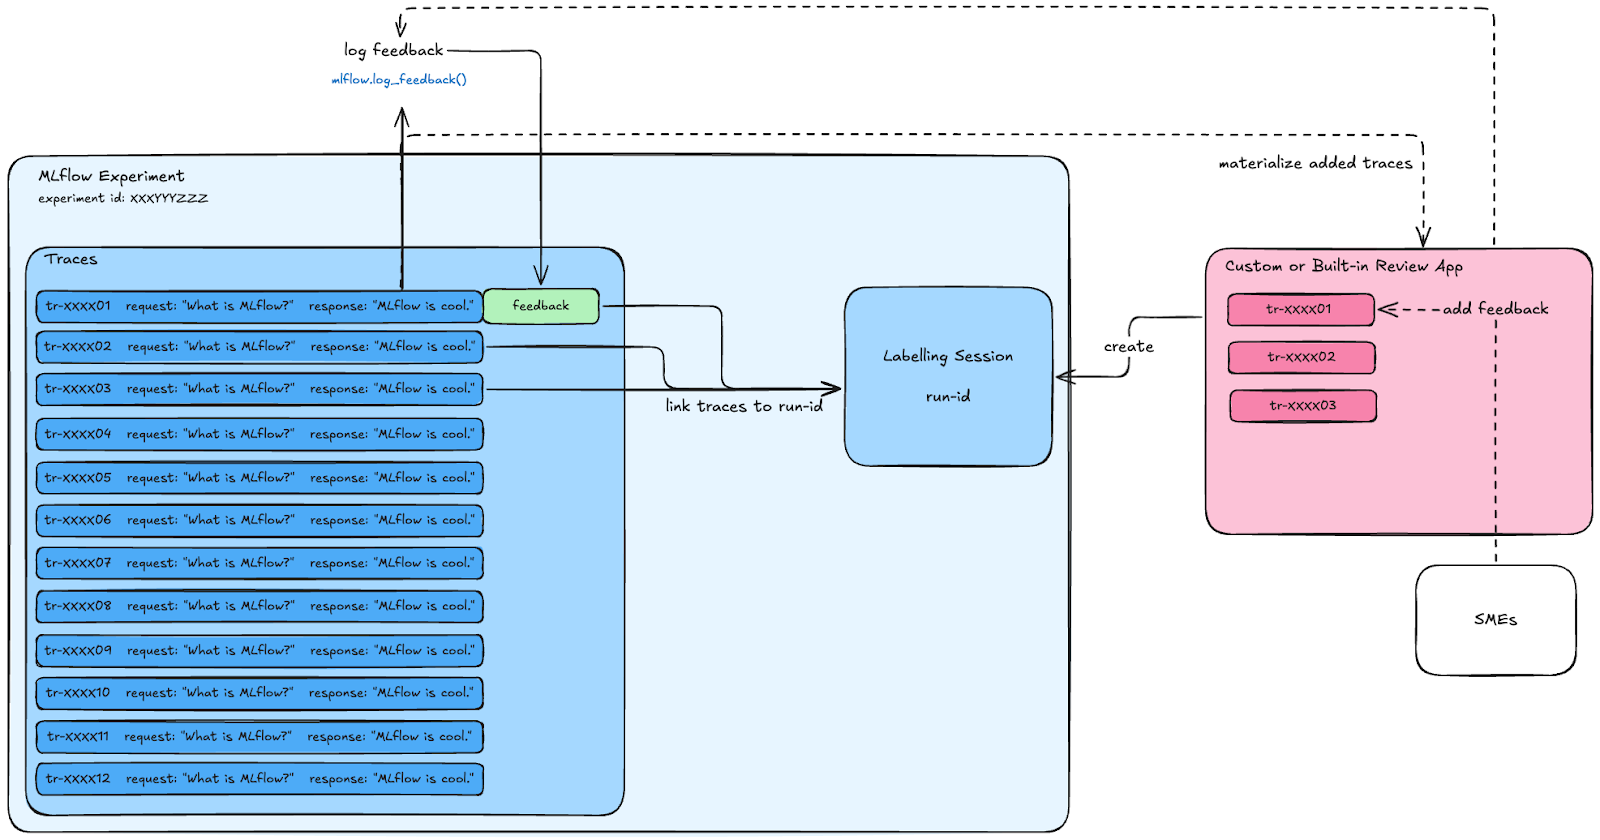
To create a Slackbot that can perform the same tasks as a custom review app, we will need to host it on a Databricks App. In this app, we are going to use labeling sessions slightly differently. Instead of interacting with pre-selected traces, we will allow SMEs to interact with the agent directly, creating traces and adding them to an already- created labeling session immediately. Then, the SME can add feedback via Slack interactions.
Building the Slackbot Review App
Follow along with the code here.
This is the experience we want:
Human experts ask questions in a Slack channel.
The agent answers the question in the same Slack thread.
Human experts provide feedback via Slack shortcuts.
Therefore, our Slackbot should:
Listen to messages in Slack.
Call our agent in Databricks.
Collect feedback from SMEs in Slack.
Annotate MLflow traces with that feedback.


Some housekeeping
Before we get started with writing the Databricks app, we will first need to create the following:
Creating an app in Slack
First, let’s create an application in Slack. For more detailed instructions, check out this Medium blog post.
I have included the app manifest for the Slackbot with all necessary configurations, but check out the necessary scope and permissions for the bot. We will definitely need the scopes: (1) chat:write (2) groups:read (3) im:read (4) mpim:history (5) commands.
Once you have installed the app in Slack, you will be given a Bot User oauth token. Save this securely. We will need to use that in our app.
Creating a Databricks App
Databricks Apps makes hosting straightforward, as each app has an associated Service Principal. All we need to do is ensure that the Service Principal has access to our MLflow experiment and agent endpoint.
Using the CLI, we can create the app:
databricks apps create slackbot
Sync local files to the Databricks workspace:
databricks sync . “/Users/$DATABRICKS_USERNAME/slackbot-app”
Then, deploy:
databricks apps deploy slackbot --source-code-path /Workspace/Users/$DATABRICKS_USERNAME/agent-proto
Creating a MLflow labeling session
We should also create a labeling session that we will use within our MLflow experiment. This creates a persistent Mlflow run that we will link all Slack-generated traces to. You can do this in a notebook with the SDK or through the MLflow experiment UI.
import mlflow.genai.labeling as labeling

import mlflow.genai.label_schemas as schemas

# Create a simple labeling session with built-in schemas

session = labeling.create_labeling_session(
    name=”customer_service_review_jan_2024”,
    assigned_users=[”alice@company.com”, “bob@company.com”],
    label_schemas=[schemas.EXPECTED_FACTS]
    # Required: at least one schema needed
)
Source: Databricks documentation.
1. Initializing the Slack client
In our Databricks App, using the Slack SDK, we can easily connect to our Slack App:
def get_slack_auth():
    w = WorkspaceClient()
    token_bot = dbutils.secrets.get(scope=”brickbrain-scope”, key=”slack-bot-token”)
    return token_bot

def start_slack_client():
    logger.info(”Initalized slack client. “)
    ssl_context = ssl.create_default_context()
    ssl_context.check_hostname = False
    ssl_context.verify_mode = ssl.CERT_NONE
    token_bot = get_slack_auth()
    client = slack_sdk.WebClient(token=token_bot, ssl=ssl_context)
    return App(client=client, process_before_response=False)

app = start_slack_client()
Note: store the Slack token in Databricks Secrets for security. Ensure your Service Principal has permissions to that secret scope.
2. Listening to events
Depending on the permissions given to your application, your slackbot will be able to receive and be able to respond to different events. Take a look at the full list of the events (source: Slack documentation).
First, let’s take a look at the message event, which observes whether or not a message was sent to a channel. In the example, I am observing every event that is sent to a channel. If you want to minimize the scope, you can select a message subtype or naively use string manipulation. I am going to be using slack-bolt moving forward to respond and take actions as the bot.
Bolt has many decorators that we can use to listen or observe events. For example, when observing the message event, I can declare the following:
@app.event(”message”)
def llm_response(event, say, client):
    logger.info(f”Message received - User: {event[’user’]}, Text: {event[’text’][:20]}...”)
   <...>
For different types of “listeners”, we can have different function arguments:
payload: also accessible via the alias corresponding to the method name that the listener is passed to (message, event, action, shortcut, view, command, options).In this case,
event== payload
say: function send a message to the channel associated with the event.ack: function that must be acknowledged that an incoming event was received by the app.client: web API client that uses the token associated with that event.logger
This is not a complete list! But these are the most important ones for our use case (source: Slack documentation).
3. Calling the agent
In our app, we want to respond to messages sent to the channel. We can easily trigger an LLM call now. However, in order to add feedback to the trace, we need to get the trace ID. When interacting with a Databricks endpoint, we can do this by setting the variable return_trace to True.
        input_data = {
            “input”: history + [{”role”: “user”, “content”:  message_text}],
            “databricks_options”: {”return_trace”: True}
        }

        response = mlflow_client.predict(endpoint=ENDPOINT_NAME, inputs=input_data)
The response output will then give me the trace ID:
trace_id = response[’databricks_output’][’trace’][’info’][’trace_id’]4. Responding to the message
To respond within a thread, we will need to use the client API. Recall that the listener argument “say” is offered with most events. However, “say” does not allow us to respond within a thread.
LLMs often use and produce Markdown as an output format. It is important to note that Slack uses its own markdown language, and although most basic syntax support is provided, some elements are absent. Take a look at what is supported here.
If you want to ensure that the output is stylized in the same way that the LLM intended, I would suggest looking at manually converting the Markdown text into Slack’s mrkdwn format. This would require some string manipulation with regex (source: Github repo).
    result = client.chat_postMessage(
        channel=event[’channel’],
        blocks=[
            {
                “type”: “section”,
                “text”: {”type”: “mrkdwn”, “text”: slack_response}
            },
        ],
        text=slack_response,
        thread_ts=event[’ts’],  # reply in the thread
        metadata={
            “event_type”: “agent_response”,
            “event_payload”: {
                “trace_id”: trace_id, # trace id in metadata
                “thread_id”: event[’ts’],
                “resource_type”: “AGENT_RESPONSE”,
            }
        }
    )
Using the Client API, we can also attach metadata to each message. This makes it easier to retrieve information across sessions, like trace_id.
We have designed the response simply, but Slack has a lot of options on how to design a Slack message. Take a look at Block Kit Builder to see how you can structure your Slack message with buttons, dividers, images, inputs, etc.
5. Adding feedback
We will use a Slack message shortcut to log feedback. I found this method to be the most straightforward and easiest to customize. However, we can also use Slack message blocks to design a feedback form as well.
When I use the add_feedback shortcut, this triggers the event “message_shortcut”. Because we have added the trace id to the metadata of the agent response Slack message, we can access that trace_id in the Slack shortcut.
@app.message_shortcut(”log_feedback”)
def handle_log_feedback_shortcut(ack, shortcut, client):
    ack()
    logger.info(f”Feedback message shortcut triggered by user: {shortcut[’user’][’name’]}”)

    message = shortcut[’message’]
    message_ts = message[’ts’]

    metadata = message.get(’metadata’, {})
When handling this event, we can use the Client API to open a view with the formatted feedback form. We can add comments and binary feedback. These inputs will be translated as input for mlflow.log_feedback(). However, log_feedback can take all sorts of values: integers, floats, categorical values, and multiple-category feedback (source: Databricks documentation). So, feel free to customize this to what your evaluation system needs.
Since this is a form, once we hit submit, we will need to respond to another Slack event as well. This will create another Slack event called “view”. This is where we actually handle the feedback submission and use mlflow.log_feedback(). For your review app, you can also log expectations (aka ground truth) using another function log_expectations().
6. Linking everything to a labeling session
We still have not linked these traces to a labeling session. To do so, we fetch the run ID associated with the labeling session and the trace_id:
def link_traces_to_run(run_id: str, trace_ids: List[str]) -> Dict[str, Any]:
    creds = get_databricks_host_creds()
    url = _get_mlflow_api_url(’/traces/link-to-run’, creds=creds)
    data = {’run_id’: run_id, ‘trace_ids’: trace_ids}

############################
in the @app.event function:
############################

link_traces_to_run(run_id=LABELLING_SESSION.mlflow_run_id, trace_ids=[trace_id])
logger.info(f”Traces linked to run - Run: {LABELLING_SESSION.mlflow_run_id}, Trace: {trace_id}”)
7. Handling with conversation history
Slack threads make conversation history management simple. Instead of requiring a database to checkpoint, we can simply fetch the threads themselves. Using the client API and the thread ID:
def get_thread_messages(client, channel, thread_ts):
    response = client.conversations_replies(
        channel=channel,
        ts=thread_ts,
        inclusive=True,  # Include the parent message
        limit=10  # Max messages to retrieve
    )
    logger.info(f”Retrieved {len(response[’messages’])} messages from thread {thread_ts}”)
    return response[’messages’]
Happy reviewing!
Take a look at the full implementation and code here.
There are no limitations in how you can use MLflow review apps! You can easily bring the feedback mechanism in MLflow to Slack, reducing any friction in the feedback process. Thanks for reading.