
A Beginner's Guide to MLOps Stacks on Databricks
Equipped with an almost excessive amount of diagrams!

MLOps Stacks is a template using Databricks Asset Bundles (aka DABs) to implement an MLOps workflow. It is easily customizable, but if you are not familiar with DABs or MLOps, it can get overwhelming quite quickly. There are a lot of folders. A lot of files. But by the end of this blog, you will understand how to use this template for your own use case.
Instantiating your first MLOps Stack is quite easy. I would recommend creating a basic one using the instructions here and walk through this blog. You can also take a look at the template directly in the public Github repository: databricks/mlops-stacks.
Your project bundle is controlled by the databricks.yml file. This contains all of the configurations (aka what the STAGE workspace is, what the DEV workspace is, what the `prod` catalog is, etc.). This file also points to all of the workflows in the project. Surprise! These configurations are also written in yaml. And the workflow configurations point to the notebooks in the project.

This walkthrough follows the “Deploy code” approach, which is generally recommended by Databricks. This means that the code moves from development to staging and then production. The model is trained in each environment. However, there are certain scenarios where “Deploy model” works better, like if your model training process was quite expensive. This is why the “Deploy model” approach is more common in LLMOps, but more on this in a later blog post.
Let’s walk through a theoretical example of how this would work.
Development
Step One: Exploratory Data Analysis

In the DEV environment, we explore new data alongside existing production data stored in the `dev` catalog. Perhaps, during this exploration, there is a discovery! There is a eureka moment! Now, we need to train and tune a new model.
Step Two: Model Training
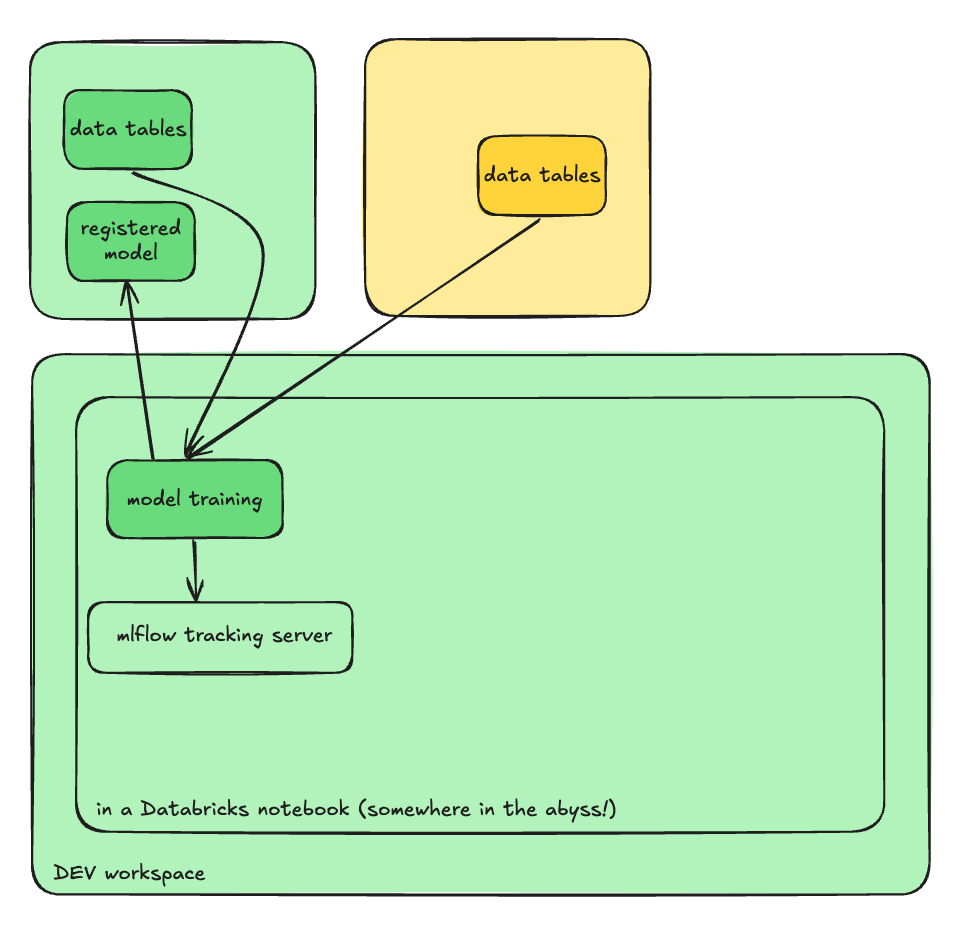
We are still in the DEV environment, but now we can use MLFlow to keep track of everything. If you are unfamiliar with MLFlow, I would recommend taking a look at this demo notebook linked here. But shortly, MLFlow is a way for you to track your experiments and within that, your runs (each run = iteration of training). If that concept is still confusing, take a look at the docs here.
Using MLFlow, we can log key metrics, parameters, and artifacts across different runs, enabling us compare and contrast different trained models and pick the best model. Finally, once we are satisfied with the model that we have created, we can register the model in the `dev` catalog.
Step Three: Push Changes

Let’s update the repository now! Within a Databricks workspace, we can create a temporary branch (here we call it `dev`) and merge the updated notebooks.
Note: if you are following along via the MLOps Stacks template, you can see that there is a logical separation in the template structure:
feature_engineering
contains feature transformations
In this example, we are using the Databricks Feature Store, which is a centralized repository for managing and serving features
monitoring
contains code for model monitoring
we separate this from validation as monitoring is on-going in production while validation occurs pre-deployment. In this template,
ModelValidation.pyis the second part of the Model Training workflow
validation
contains code for model validation
deployment
contains serving endpoint setup and configuration
training
contains model training logic (e.g. all of the MLFlow)
This separation follows the principal of separation of concerns— each directory has a specific responsibility in the ML lifecycle. It also makes it easier to:
have different teams work on different aspects of the lifecycle
maintain and update specific parts of the pipeline
reuse components across different projects
implement proper testing of each component
And now, after the branch is created, we can commit the code directly to the `dev` branch. This will now move us to the next part of the process.
Staging
Step One: Pull Request

Once our code is merged into the `dev` branch, we can open a Pull Request to merge the new changes to our `main` branch. It is time to test all of these changes.
Databricks Asset Bundles allows you to easily maintain Databricks resources, but you will still need a way to automate and run the workflows. I have personally used a lot of Github Actions, but you can set up Azure DevOps Pipelines, GitLab Pipelines, etc.
Step Two: Unit and Integration Tests
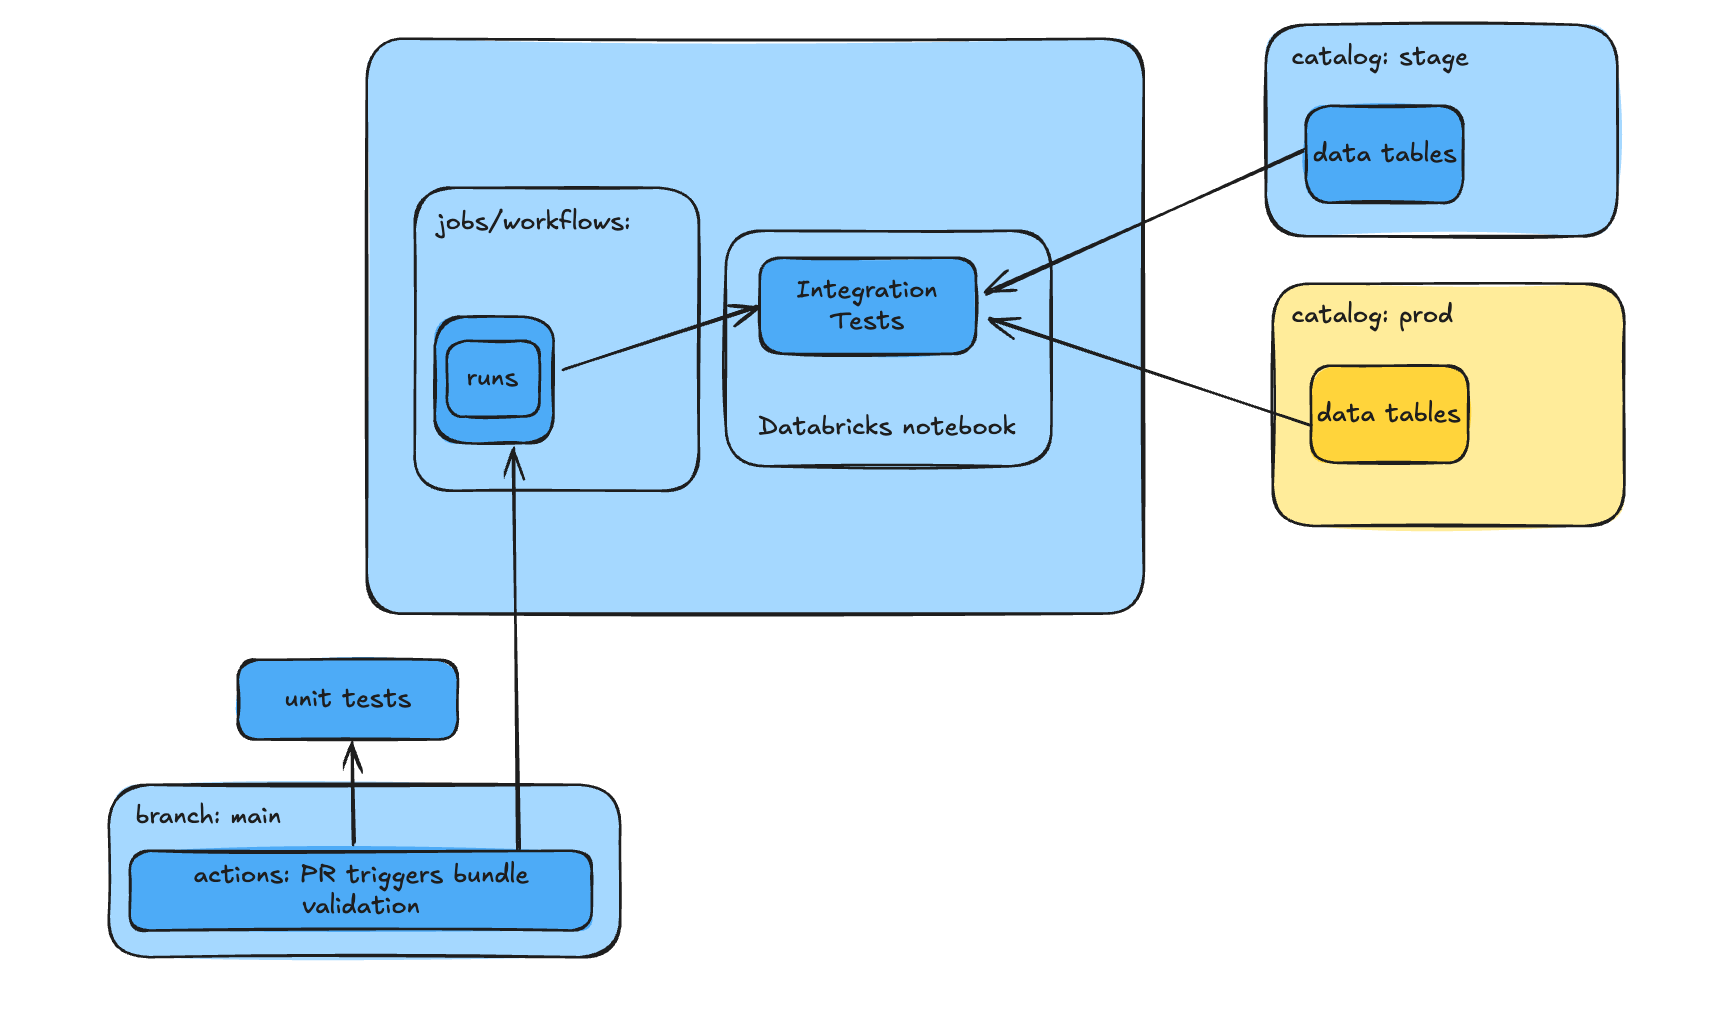
Opening a PR immediately triggers multiple workflows (via Github Actions or whatever process you have set up) for Unit Tests and Integration Tests.
The Integration Tests workflow (link to Github Actions workflow) uses Databricks Asset Bundle (DAB) commands to create the assets in the Staging environment and trigger the workflow to run the necessary notebooks:
# Validate the bundle configuration
databricks bundle validate -t test

# Creates all necessary assets in stage environment
databricks bundle deploy -t test

# Executes feature engineering pipeline
databricks bundle run write_feature_table_job -t test

# Executes model training pipeline
databricks bundle run model_training_job -t test
The `-t test` flag specifies that these commands should target the STAGE environment, as defined in the databricks.yml file.
We are running two jobs: the feature engineering workflow (link), which computes all of the features and stores them in the Databricks Feature Store, and the model training workflow (link), which trains the model with the Feature Store and then validates the model.

These test can be expanded even further to cover all aspects of the model workflows:
Feature Engineering tests
verify the data transformation pipeline
For example, test that the data types are expected, the missing values are handled properly, the feature values are within an expected range, and the Databricks Feature Store itself is working properly
Model Training tests
verify the model training process
For example, ensure that the resources are utilized properly; metrics and parameters are correctly logged in MLFlow; and the model can be saved and loaded
Model Validation tests
verify the model’s performance and behavior
For example, make sure the model predictions are expected, compare the model’s performance against previous versions, and check if the model is meeting the expected thresholds
Model Deployment tests
verify that the model can be deployed and served
For example, test performance under expected traffic
Model Inference tests
verify the model’s behavior during prediction
For example, ensure that the inference speeds meets requirements, monitor resource consumption, and verify that data is being logged to the Inference Tables correctly
Model Monitoring tests
verify the monitoring system is working
For example, test the alerting system and validate the visualizations in the Dashboards
After a successful job run, you can successfully merge the `dev` branch to the `main` branch. Let’s move to the next and final part of the process.
Production
Step One: Release Branch

After successfully validating the changes in the STAGE environment, we can now create a `release` branch to update the changes in the PROD environment. This branching strategy allows us to provide a clear snapshot of what is being deployed to production, enables hotfixes if issues arise without disrupting the main branch, and creates a history.
The creation of a `release` branch triggers a production deployment workflow in your CI/CD system.
Step Two: Create Assets
This is similar to what happened before:
# Validate the bundle configuration
databricks bundle validate -t prod

# Deploy assets the PROD environment
databricks bundle deploy -t prod
Instead of running any specific jobs, like we did in the STAGE environment, we are simply deploying the assets (link to Github Actions workflow) because they are scheduled. This schedule is defined in each workflow configuration.
Now, with assets deployed to production and workflow scheduled, we have completed the full MLOps lifecycle implementation.
Next Steps
Ready to start implementing?
Create your first MLOps Stack using the template repository.
Review the example notebooks in the template and understand how each component works.
Adapt the workflow configurations to match your needs.
Set up your CI/CD pipeline using Github Actions or your preferred tool.
In future posts, we will dive deeper on LLMOps and Best Practices. If you have any questions about implementing MLOps Stacks, feel free to reach out via the comments.
I will leave you with a poll: